
 Beaded Amulet Bag
pattern by Anne R.
 Bobbin Lace Icicle
pattern by Carolyn R.
 Tatted ornaments
patterns by Carolyn R.
 Icicles w/crystals - patterns by Carolyn R.
Photographs (above) are Patterns completed from monthly programs.
Tatting patterns used for Demonstrations (at The Feast of the Hunters' Moon):
 patterns by Sheila C.
Sheila C's Floral:

Wind Two Shuttles CTM
R1: 3 - 3 - 3 - 3 cl r
R2-R5: 3 +join to the last picot of the previous ring, 3 - 3 - 3 cl r
SR 6: 3 - 3 / 3 - 3 cl r
SR 7: 3 -3 / 3 - 3
R8 - R9: 3 +join to the last picot of the previous ring, 3 - 3 - 3 cl r, rw
R10-R11: 3 +join to the last picot of the previous ring, 3 - 3 - 3 cl r
SR 12: 3 - 3 / 3 - 3
Continue SR 7 - 12, until you reach desired length
R1 Start with first Ring
- Picot
+ join
cl r. close ring
rw reverse work
CTM Winding your shuttles with the continuous thread method
SR Split Ring
Sheila's Split Ring:
.jpg)
Wind two shuttles CTM
R1: 4 - 4 - 4 - 4 cl r
SR: 4 / 4 cl r
SR: 4 - 4 / 4 - 4 cl r
Alternate Split Rings until you reach desired length
Sheila C's Braid:

Wind one shuttle.
Ring 1: 7 - 4 - 4 cl rRing 2: 4 + 2 - 2 - 2 - 2 - 2 - 4 cl r, RWRing 3: 7 - 4 - 4 cl rRing 4: 4 + 2 - 2 - 2 - 2 - 2 - 4 cl r, RWRing 5: 4 + 7 - 4Ring 6: 4 + - 2 - 2 - 2 - 2 - 4
Repeat Ring 5 & Ring 6 until you reach desired length
- Picot
+ Join to the last picot of the previous ring
cl r Close Ring
RW Reverse Work
-------------------------------------------------------------------------------------
Carol P's Tatting: Basic pattern of Split Rings

Wind Two Shuttles (CTM*)
Ring: 5 - 5 - 5 - 5 , cl r
Split Ring: 5 - 5 / 5 - 5 , cl r
Continue split rings until the desired length

* Winding your shuttles with the continuous thread method. (CTM)
---------------------------------------------------------------------------------------------
Carol P's Tatting: Basic Ball and Shuttle pattern

Wind shutle, do not cut from the ball of fiber.
R1: 4 - 4 - 4 - 4 , cl r, rw
Chain: 4 - 4, rw
Rings: 4, + join to the last picot of the previous ring, 4 - 4 - 4, cl r, rw
Continue Chain & Rings until you reach desired length.

R1 Start with first Ring
- Picot
+ join
cl r. close ring
rw reverse work
CTM Winding your shuttles with the continuous thread method.
SR Split Ring
Chain
---------------------------------------------------------------------------------------------
Carol P's basic clover edge pattern:
 Green clover edge ...
 Lizbeth size 20 (top), Elisa size 10 (bottom)
R1 Start with first Ring
- Picot
= Longer Picot
+ join
cl r. close ring
rw reverse work
CTM Winding your shuttles with the continuous thread method
CH Chain

CTM : Wind Two Shuttles
R1 5 = 5 = 5 - 5 cl r.
CH 4 - 4 = 4 - 4 rw
R2 5 = 5 + 5 - 5
R3 5 + 5 - = - 5 - 5 cl r.
R4 5 + 5 - 5 = 5 cl r.
Repeat CH: 4 - 4 = 4 (* - or =) 4
* use - to continue edge OR use = for the last ring
---------------------------------------------------------------------------------------------

Bobbin Holder Pattern - Crochet.
Pattern by Carolyn R.
Crochet Hook H - Sugar & Cream Cotton Yarn
Ch 32
Dc in 5th chain from hook, ch 1
*Skip 1 ch, dc in next ch, ch 1*
* to * across to beginning
Cut yarn, pull all ends thru loop
There should be 12 holes

----------------------------------------------------------------------------------------------------------------------

Knitted Bobbin Holder
Modified pattern by Kelly S. (available on Ravelry, FREE download)
https://www.ravelry.com/projects/LeliaEvelyn/knitted-ribbons
I started with SIX yards. I used Ribbon Three. CO 28 which gave the bobbin holder 12 holes. Had 33” left at the end of the project.

-------------------------------------------------------------------------------------------------
Carol P's tatting patterns:


R1 = Ring 1
ds = double stitch
- or p = Picot
vsp = very small Picot
+ = join
cl r. = close ring
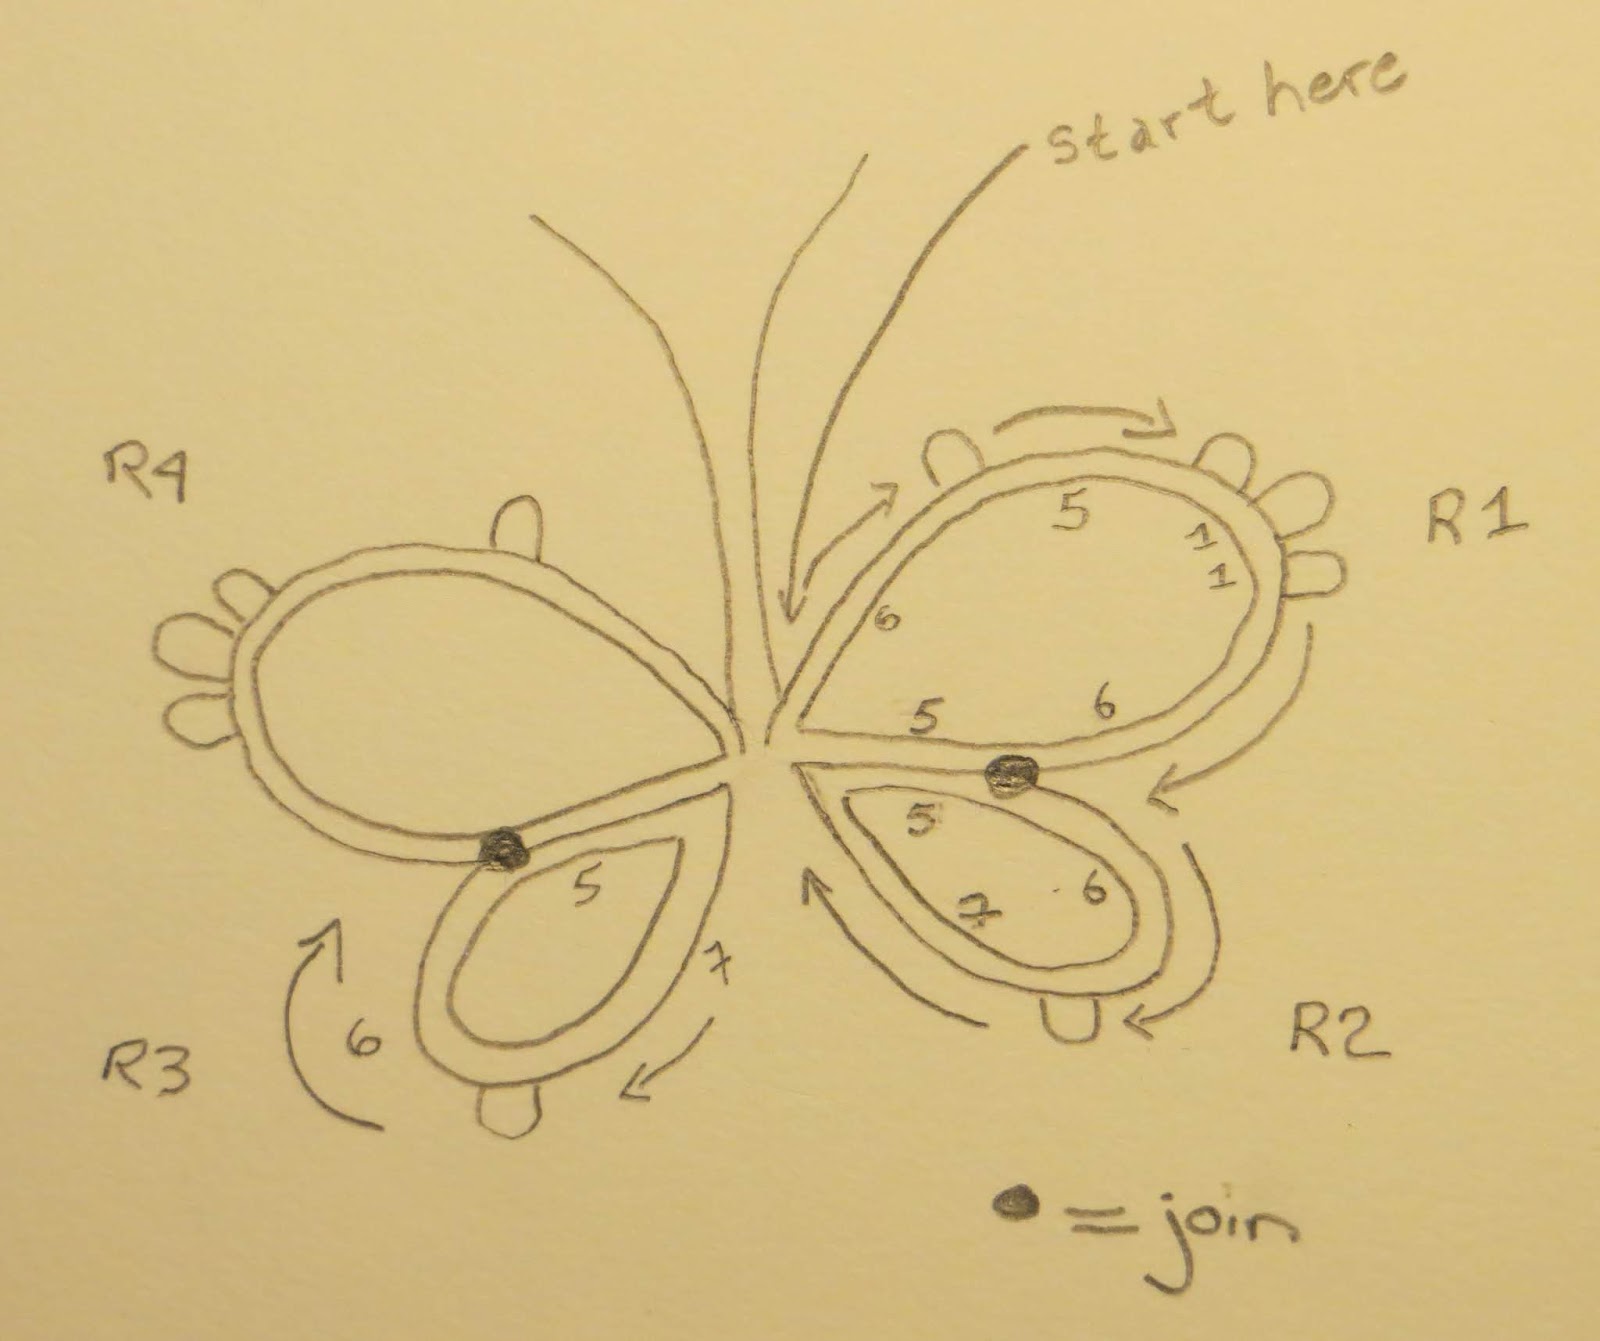
Start in the center. First ring. R1: 6 ds, p, 5 ds, p, 1 ds, p, 1ds, p, 6 ds, vsp, 5 ds.
cl r (close ring)

Ring 1 (R1)
Begin second ring. R2: 5 ds, + (join to the last p of the previous ring), 6 ds, p, 7 ds, cl r.

Ring 2 (R2) join

Ring 2 (R2)

Ring 3 (R3)
Last ring. R4

Ring 4 - join

4 tatted rings!
Additional beginner patterns to try:
 by Carol P. intended to be used
as flower centers:
https://lelia-stitchesoflife.blogspot.com/2012/10/kanzashi-flowers-wtatting.html
----------------------------------------------------------------------------

Tatted Spiral Ornament.
Exclusive pattern from Lafayette Lacemakers newsletter.
Design by Carolyn R.
Revised 5 January 2026
No comments:
Post a Comment